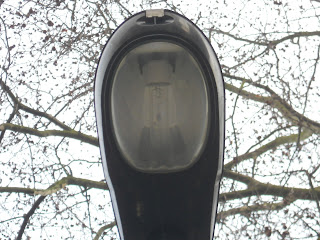
Meanwhile I was assigned the task of modelling a prop for our piece. The idea is that during the chase sequence the monster's going to pick up a street light and throw it at our Parkour character. So I volunteered to make the street light required. Firstly I looked at some of the images my group had taken from kilburn park that included the street lights in the area. I did this because I wanted my street light to look exactly like the others in the sequence so that it fitted into the scene realistically. I used the image below as reference for my street light.
I began modelling. I enjoyed modelling the street light as i thoroughly enjoy modelling, it helped me to further my knowledge. Below is an image of the finished model of the street light I am fairly happy as it looks fairly realistic which is what was required.
Front View
Side View Left
Side View Right
Back View
Perspective View
The next step was for me to UV map my street light so that I could texture it. It was crucial that i got the UV map good enough so that I could texture it well and its vital the texture is good so that it looks as realistic as possible. Below is an image of the UV layout before I UV mapped the street light, as you can see its not clear what is what.
Below is an image of the UV layout after I UV mapped the street light. I used a bundle of UV techniques in order to create this UV layout. I used cylindrical, planar and spherical mapping. I am very happy with this UV layout as I think it is clear what each part is and this will allow me to get the texturing right.
After UV mapping it was now time to texture. I took a UV snapshot of the UV layout shown in the image above and opened it up in photoshop, this is where I applied the textures. However before I did this i needed to find some textures to apply. I decided that it would be a good idea to take some close up pictures of street lights in the area where the street light I modelled was going to be placed. So I waited until we went filming and I saw the spot where my street light was going to be and took some close up images of a street light near by. I found that these street lights differed from the street lights in the reference image slightly. They didn't differ too much in shape so the model was fine however these street lights were black but as I was using them for the texture it did not matter. Below are the images I took that I used for the textures of my street light.
I then applied some of these textures to the UV snapshot in photoshop. I played around until I got it looking just right. Unfortunately I didn't get the number 13 sticker onto my street light texture but that doesn't matter too much. Below is an image of the UV snapshot with the textures applied.
I then assigned a blinn material to my street light model and loaded this textured UV snapshot. This then gave me my textured street light. Below are some images of my finished street light.
Front View
Side View Left
Side View Right
Back View
Bottom View
Bottom View of Lightbulb
Perspective View
Overall I am very happy with the street light it progressed my knowledge of modelling, UV mapping and texturing. I think that this street light looks realistic enough to work well within our piece.


No comments:
Post a Comment