Monday, 14 March 2011

UV Mapping The Monster

So we all took different roles for the whole creation process of the monster. Our roles were as followed Matt modelled the robotic arm, Perri sculpted the monster, James rigged the monster, Nat textured the monster and Will was animating the monster. My job role was to UV map the monster. So myself and James had to wait for Matt and Perri to finish the modelling and sculpting of the monster and its robotic arm, this was so I could begin UV mapping and James could begin rigging. Then Nat had to wait for me to finishing UV mapping so she could texture the monster. Which meant that Will had to wait for Nat to finish texturing and James to finish rigging so he could then finally start animating. So as you could see it was vital that we kept to our mini deadlines that Nat set us because if we didn't then we would end up holding each other up, which would then have an effect on the time we assigned ourselves to finish the project.

The UV mapping of the monster was the most complex UV layout I had ever done. However I thoroughly enjoyed it and I learnt a lot about UV mapping. It took a long time because there were so many little pieces that needed to be sewn to their correct shells. It took a lot longer than I originally expected and I needed a few more days to complete it. Which then had an effect on some of the others and their roles. I used automatic mapping to UV map the monster below is an image of what the UV layout looked like after I did this.


As you can see from the image above I had my work cut out, there were hundreds of little pieces that needed to be sewn to the correct shells so that it was clear to Nat exactly what she was texturing and that the texture would fit the model perfectly. After working around the clock for a fair few days I finally finished and was left with the completed UV layout shown in the image below. 


I am extremely happy with this UV layout despite it being so time consuming I thoroughly enjoyed it and learnt a lot. I think that this UV layout is good enough for Nat to start texturing as you can see what each shell is. If I were to do this again and had more time then I would take more time with the head. The shell of the head is in the bottom right hand corner of the image above and as you can see its not very clear. So I would spend more time editing the UV's making it look more like the head of the monster. 

Filming

We had our location ready, our actor sorted and our camera and equipment booked out. So we set out and got our filming done. We doubled up on shots just to be safe and got all the shots we needed. Nat then put the shots together which gave as an overall video. Below is a link to the video, the video is also posted on the group blog.   


We still have to film the ending for our piece which means we need to film a shot in Jared's office at uni and film some footage using green screen. However now we have the bulk of our footage filmed we need to finish the monster and prepare everything so that we can get onto compositing.  

The Street Light

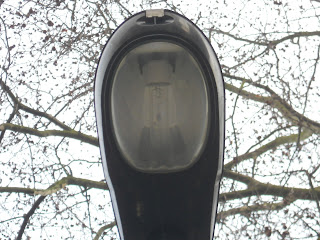
Meanwhile I was assigned the task of modelling a prop for our piece. The idea is that during the chase sequence the monster's going to pick up a street light and throw it at our Parkour character. So I volunteered to make the street light required. Firstly I looked at some of the images my group had taken from kilburn park that included the street lights in the area. I did this because I wanted my street light to look exactly like the others in the sequence so that it fitted into the scene realistically. I used the image below as reference for my street light.


I began modelling. I enjoyed modelling the street light as i thoroughly enjoy modelling, it helped me to further my knowledge. Below is an image of the finished model of the street light I am fairly happy as it looks fairly realistic which is what was required. 


Front View 


Side View Left


Side View Right


Back View


Perspective View

The next step was for me to UV map my street light so that I could texture it. It was crucial that i got the UV map good enough so that I could texture it well and its vital the texture is good so that it looks as realistic as possible. Below is an image of the UV layout before I UV mapped the street light, as you can see its not clear what is what.  


Below is an image of the UV layout after I UV mapped the street light. I used a bundle of UV techniques in order to create this UV layout. I used cylindrical, planar and spherical mapping. I am very happy with this UV layout as I think it is clear what each part is and this will allow me to get the texturing right.


After UV mapping it was now time to texture. I took a UV snapshot of the UV layout shown in the image above and opened it up in photoshop, this is where I applied the textures. However before I did this i needed to find some textures to apply. I decided that it would be a good idea to take some close up pictures of street lights in the area where the street light I modelled was going to be placed. So I waited until we went filming and I saw the spot where my street light was going to be and took some close up images of a street light near by. I found that these street lights differed from the street lights in the reference image slightly. They didn't differ too much in shape so the model was fine however these street lights were black but as I was using them for the texture it did not matter. Below are the images I took that I used for the textures of my street light. 


I then applied some of these textures to the UV snapshot in photoshop. I played around until I got it looking just right. Unfortunately I didn't get the number 13 sticker onto my street light texture but that doesn't matter too much. Below is an image of the UV snapshot with the textures applied. 


I then assigned a blinn material to my street light model and loaded this textured UV snapshot. This then gave me my textured street light. Below are some images of my finished street light. 


Front View


Side View Left


Side View Right


Back View


Bottom View


Bottom View of Lightbulb


Perspective View

Overall I am very happy with the street light it progressed my knowledge of modelling, UV mapping and texturing. I think that this street light looks realistic enough to work well within our piece. 

Location Hunting Round 2

Unfortunately I was unable to make it this day, but the rest of the group went to Wembley Park and Kilburn council estate to check out potential locations for the setting of our project. The group first went to Wembley Park to try and hunt down a Parkour hotspot found via some internet research. They were unable to find it but did find some potential places within the area. They then went to Kilburn council estate and found that it was extremely well suited for the type of area we were looking for. It provided lots of potential for our chase sequence and provided lots of obstacles for our Parkour character. The group showed me some of the pictures they took of the area and told me how it was what we were looking for and so it was decided we finally had our location for our sequence. Now its time to film!

Mood Boards

So the next task was to create digital mood boards for the texture of the monster and the location. Nat assigned us this task so that we could put our ideas forward as to how we wanted the monster to look texture wise and to show our ideas of the sort of environment we were looking for in terms of setting, lighting and colour.

The idea of the monster was based on a monster from a film called the Black Lagoon. The idea was then developed and the idea was now the monster from the Black Lagoon but he had a robotic arm.  Below is an image of the monster from the Black Lagoon.  


I looked at images and clips of the monster from the Black Lagoon and other swamp monsters and got an idea of how our monster was going to look. Below is my mood board for the textures of the monster.


The mood board above shows a selection of images that I thought would look good as the texture for the monster and its robotic arm. I choose lots of different images of scales and shells as our monster was going to have this hard scaled/ shelled skin. I also tried to find a variety of colours as I wanted to explore different options rather than just stick with the stereotypical monster green. For the images of the metal texture for the robotic arm I looked into different types of metal how some had raised groves, others had a smoother feel and some looking very beaten with holes and chunks missing. I stuck to a traditional silver metal for most of my images. However I did choose one blue metal texture, this attracted my eye because I thought it would work well with the monster's colour scheme, I also liked how it had a damaged look and thought that this would add to the intimidating image of the monster.       


I then selected some images which resembled my idea of the type of scene our piece should be set in and created a digital mood board. Below is the mood board for my ideas of the type of location for our piece. 


I choose these images because they relate to Parkour and give an idea of the sorts of obstacles where our Parkour character could showcase his skills. Parkour also has a very urban theme as it mostly takes place in urban areas. So when it came to selecting images I choose images of areas that gave off an urban theme. That way the main character and the environment match. I also used these images to explore lighting and look at the different effects lighting can have. I took into consideration day and night and how the lighting changed. I did this so that I covered both areas which allowed me to make the conclusion that I preferred our piece to be set in the day. I chose the image in the centre because I think it used the camera well to give a feel of loneliness and venerability in an urban area. Therefore showing my how powerful the camera can be. Overall these mood boards were very helpful as they allowed me to develop my ideas.  

Wednesday, 9 February 2011

Location Hunting

On friday myself, Nat, James and Perri ventured out to London. We explored Waterloo, Southbank and London Bridge. While Matt and Will explored Shoreditch. The aim was to find a location in one of these areas that would be a suitable location for our project. So things that we needed to ensure the location provided were plenty of obstacles. This is so we can showcase our characters Parkour skills. Parkour gives off a very urban theme. Matt and Will were exploring this more in Shoreditch. While looking out for these sort of locations we also needed to consider space and make sure that there was enough space to bring our 3D monster into the scene. Location hunting will provide to be a vital stage of pre-production as it will help us to visualise how the project is going to look and will help to give us a more realistic storyboard and animatic.

Unfortunately to my stupidity I forgot my camera when we went looking at locations, however I have managed to find some images of some of the places we looked at. Yet there is a positive to finding images rather than taking my own and that is that some of  the images i found were taken at night. This is a positive because we visited the area in the day so the nighttime images show a different view. Below are the images of some of the places that I thought would be ideal for our project and provided obstacles that were vital for showcasing our characters Parkour skills.


I found this trip very beneficial as it gave me a clear indication of the sort of area that our piece should be filmed in. Key attributes the area needed were obstacles that would showcase our characters Parkour skills and a theme that makes our project stand out, such as an urban theme that matches the theme of Parkour.

 However there are a few major drawbacks, the first drawback would be that with these area's being in central London they are heavily populated pretty much all the time. Therefore it would be difficult to film as there would always be people getting in the way, and would provide a problem for our project. The reason I say that is because if you have a huge monster chasing a man through a heavily populated street I'm pretty sure the other people in the street are going to react and run away themselves, so it would be pretty challenging trying to get every passer by to act for us. The other problem which I thought this area had was that despite having some obstacles for our Parkour character there were not enough obstacles located near each other. Basically there were some stairs that would be perfect to showcase some Parkour skills and would work well in our chase sequence yet once you have over come them then there was just a flat straight path for a fair while before you came to the next obstacle. Therefore this area is better suited for just a normal chase sequence rather than the chase sequence we have in mind. 

The images above show some of the problems I am talking about. Overall I think it is safe to say that we have ruled out this area for our project, now we need to find some more areas to go and look at and hopefully find a location thats better suited to our project. 

Monday, 31 January 2011

Research

As the idea of the story is a man using his Parkour skills to get away from a monster I thought it would be a good idea to do some research into Parkour. Especially as I have personally had no experience with Parkour. I've seen some people doing it before and watched a documentary on it several years ago but still don't know too much about it. I thought that some research would broaden my Parkour knowledge and would help with finding a location. The research will help me to find a sufficient location because it will give me an idea of the sort of obstacles that can be used to showcase some Parkour skills.

So firstly what is Parkour?

I went to my faithful friend Wikipedia to find out exactly what Parkour is and it states that 'Parkour is a non-competitive, physical discipline of French origin in which participants run along a route, attempting to negotiate obstacles in the moss efficient way possible, using only their bodies. Skills such as jumping, climbing, vaulting, rolling, swinging and wall scaling are employed.'

Parkour can be practiced anywhere, however it is most commonly practiced in urban areas as these areas are more preferable as they provide lots of obstacles. This piece of research is extremeley useful as it tells me exactly what type of location we should use for our project.

However Parkour does bring some confusion as it is commonly confused with the art of Free Running. Parkour does not employ the use of flips which Free Running does. My take on it is that Parkour is more of a natural sport or hobby and free running is something which requires stylish tricks and flips, therefore making it more showboaty than Parkour.

Parkour and Free Running

The link above is a video clip that shows both Parkour and Free Running but it helps you to understand what the difference between the two is and also shows you the skills of Parkour. Which is very beneficial as it gives me a clear view of the sorts of skills that Parkour uses.

Through my own research and a heads up from fellow team member Will I discovered that a man called David Belle is credited as the founder of Parkour. He has a very interesting background and seems to have lead the way of Parkour. Below is a link which is a video that shows the best clips of this extremely skilled frenchman.

The Best Of David Belle

I then started to wonder if there were any films or commercials that had employed the use of Parkour. So i started to look for some clips. As I started to rack my brains i remembered there being a chase scene that adopts the skills of Parkour in the 2006 film Casino Royale. The link below shows the whole chase scene.

Casino Royale Parkour Chase Scene 

I also remembered seeing a trailer in the cinema not that long ago which was a sports commercial. Its a 2D animation of a character running and over coming obstacles as the environment around him is being destroyed. Unfortunately I have searched everywhere for a video clip of this trailer but I can not seem to find one anywhere. I searched Parkour chase scene's in films in youtube and came across some very interesting scenes. One than stood out was a Parkour chase scene from the film District 13. Below is a link to the clip.

District 13 Parkour Chase Scene 

That same youtube search lead me to a short film which is basically just a Parkour chase scene. Below is a link to the video.

Under Penalty Parkour Short Film

I then tried to find some commercials which use Parkour. I found a commercial for an energy drink called Cheetah Powersurge. Below is a link to a video of the commercial.

Parkour Cheetah Powersurge Commercial 

I found these video's very beneficial as they influence and inspire thoughts as to what type's of camera angles/ shots we should include and the sort of locations and obstacles that should be included in our piece. I now feel a lot more prepared for the next stage of searching for an ideal location.